|
A quick warning
- the audio is set very low on many of these
videos so if you crank up the volume on your
speakers, and you will have too, just remember to
turn the volume down after viewing the videos or
you will be blasted out of your seat with whatever
makes the next sound.
The sound however is crisp and clean and matches the videos
perfectly (at least on my system). All videos are
.mov files so you can scrub through them which is handy if you need to backtrack a bit. This also means that Mac users will have no problems here either.
Ive completed all of the 45 videos (24 on 1st DVD and 21 on the 2nd
DVD) and WOW, this is an impressive tutorial series on modeling a car.
The first video is
a very quick overview of the tools that you will
be using.
If you are new to lightwave you need to watch these carefully as they cover most of the tools that you will using throughout the video series. If you already know where most of the tools are these will simply be a great refresher. In fact there are some videos in the "free" section on the DVD - check out the spline and subpatch modeling videos before you start on the main videos. You will find these videos useful.
Spend some time getting used to
all of these tools, how they work and what the hot keys
are as it will make the rest of
the videos easier to follow.
Its amazing what you can accomplish in modeler using only a handful of tools. Gerald uses 6 to 10 basic tools consistently throughout the course. Although the videos don't say so (and they should in my opinion) you should set up keyboard shortcuts for "select loop, weld average and
bandsaw." You don't have to do this but you will be using these tools a lot and going through the menus all the time to get to these tools can get annoying.
Gerald, the author, starts with using splines (a
rough outline of the car in 3D) and patching
(filling in the rough outline with polygons)
to rough out the basic shape of the vehicle and then begins methodically detailing all the different areas of the car.
After creating all the
splines you should certainly have a good
handle on spline creation. Patching is
fairly easy to do so these videos go quickly.
One thing I found was that the author doesn't always say exactly why he
is putting splines or connections in certain areas
or why he patches using the divisions that he
does. After progressing thorough the video
the reasons for the placements becomes fairly
obvious but I would still have liked to hear the
rational for doing things while they were being
done. Soon you are left with a low polygon car
body and the detailing can begin.
The basic patches are turned into subpatches and
then Gerald uses a variety of techniques to add
detail, massage shapes and create the final
look. The techniques are used over and over
so will get used to the tools and the techniques
quickly. It took me some time to complete
all the videos as I only worked on the car a
couple of hours each night so you get your monies
worth in terms of time invested. It is
interesting to see the car take shape as the
detail is added slowly.
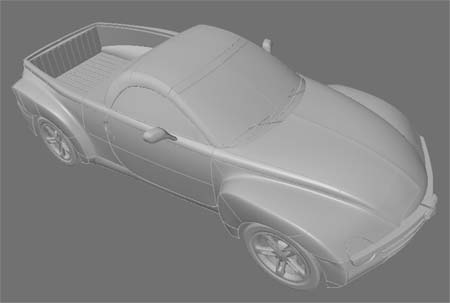
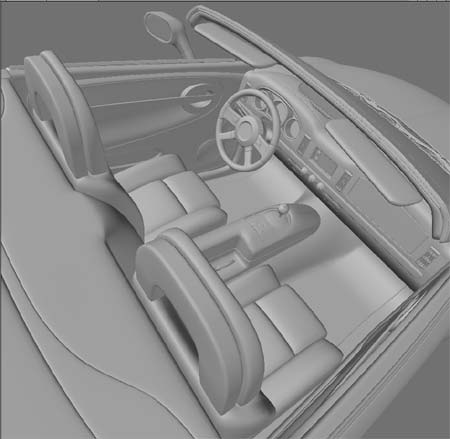
By the end of the 1st DVD you will have almost completed the body except for the tires/wheels and the lighting fixtures. The 2nd DVD finishes those off and then details the interior. Gerald uses a variety of techniques to do add detail to the basic mesh. Basically he skins a surface roughly and then adds finer details. The results are impressive.
I must say that Gerald takes you step by step through the process very well. At each step he tells us exactly what tools to use and how to use them. Probably my biggest complaint, however about this series is that I would like to have had the author explain his steps before he actually did them. Often I found myself doing things along with the video wondering where he was going with the modeling. Of course, after the session is over you understand what he was doing but it would have been nice to have a bit more commentary on "why" something was being done. Gerald does explain some steps beforehand though and his speaking style is so relaxed that you feel that you have a good friend patiently going over everything right beside you.
You will, however, have to get used to the phrase "Just a little bit" which usually means anywhere from
2mm to 5mm. Gerald says this so much that you will soon find yourself saying it even before he does on the videos. This just goes to show you that the art of modelling is not an exact science.
One thing I should point is that this is a modeling only video series. Let me repeat this, This is a "modeling only" video series. Sadly We never get to texture or render or animate this car- but Gerald alludes to this "in future videos" so perhaps there is a 3rd disc in the works over at Kurv studios - I hope so! I learned so much from these 2 videos that I wonder what wonderful tricks I would get out of the texturing. Hint to Kurv studios that I would
very much like see a continuation of this series!
File size of the finished model is large and my system slowed to a crawl if sub division surfaces were activated. My advice would be to turn off sub-D's on the main car body as you get further and further along and just turn it back on when you need too).
My best piece of advice is how you should be doing the videos. Watch each video in its entirety before trying to do the steps yourself. You will have a better idea of the general process. In the beginning you will probably have to follow along with each step but as you go along try to just watch the video and then do everything on your own, using the videos as a reminder. By the end of the series you will be well versed in the art of car modeling - well, modeling in general actually.
If you want an idea of what you can accomplish with the video series then check out the images of the mesh that I created below this review.
There are also a lot of extras on the DVD's (although the same extras are repeated on the two DVD's). There are some videos on rigging as well as a few sample rigs to play with, more modeling videos, a UV mapping video and some character modeling videos. Many of these videos are created by Larry Shultz and are very helpful.
|